I was very productive this morning. I had to be up for a work thing at 7am. I took my car into get it's six month maintenance by 9am. I tried to go to Petsmart because they told us the Akron Angels dog adoption group was going to be there starting at 11 when we dropped in last night. I waited over an hour for them and they didn't show up! I was disappointed because they had a cute dog that looked kind of like Maggie when Matt and I checked out their website last night. We're still waiting to see whether the dog I e-mailed about earlier in the week is going to be adopted this weekend. The woman I've been talking to said that she had a couple meet and greets scheduled for her but if they didn't work out she'd schedule something with us.
I heard from Mel last night that she got the present I sent her in the mail so I can finally post about it!
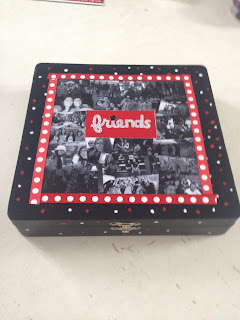
This was the first mod podge item I'd ever made. Mel recently moved away to Detroit and I'd been looking for something for a while that I could send her. After looking around on pinterest I got the inspiration to do this box.
Here are all my supplies. I found the box at Michaels for 6 or 7 dollars (so excited about that find!). The little friends tag was made on my cricut. Matt helped me design the photo collage in photoshop. I also bought the paint brushes at Michaels ($3.99) and the mod podge ($6). I used red and white acrylic paint for the polka dots and some red and white dotted ribbon I had around for an accent.
The first thing I did was to cut out the friends banner. I believe I got this off of "Create A Critter" but I'm not 100% sure. The black flower at the top of the "i" was part of the design but the dots were done with a black gel pen. "friends" is cut out at 1.5 inches and glued on a red piece of cardstock.
I used a small paint brush to dot red and white dots over the whole thing. I then used my AVG gun to apply the collage and the friends banner I had made to the box. You can also apply a coat of mod podge and use that to stick things to the box. It acts as a glue or a sealer. I started out by using photo paper for the collage but that was bubbling up a little bit so I switched to plain white printer paper which looked a lot better for this purpose. I think I applied about 3 or 4 coats of the mod podge, letting it dry in between each coat.
After it had dried, I cut the ribbon and applied it around the collage using my AVG gun to make the back sticky. To see how I made the card I sent with it at the top, go here. To see my other adventure in mod podge go here.
Hope everyone has a great Saturday. If anyone else has done anything fun with mod podge send me an e-mail and tell me about it or leave a link or comment in the comments section. I'm looking for inspiration on what to do with this awesome item!
Added to: Time to Sparkle Tuesdays


No comments:
Post a Comment